Today,
We learn how to use the ACD/ChemSketch software...
Our Madam requested us to do some tasks using the software.
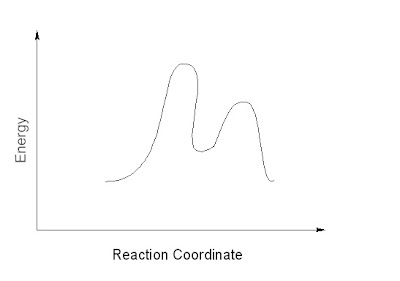
The first task is about how to draw a sample of energy reaction diagram
This task was done by our group leader Aiman. The steps are quite moderate and he solved it in just 20 minutes.

The second task is about drawing a vacuum distillation apparatus.This task was done by Hisham.
This is the easiest task and he has no problem solving it.


The last task is about drawing a DNA sample...This task is the hardest task and most student have problem in solving it.
We have to refer to our friends few times before we are able to get the task done succesfully by Hakim...

There are the step for the tutorial that we asked to do:
| Drawing the energy reaction diagram | Drawing a vacuum distillation apparatus | Drawing DNA sample |
|---|---|---|
| Step 1: Select Draw mode&click Polyline |
Step 1: Switch to the Draw mode & set 50% zoom, then click "new page" to open a new page.
|
Step 1: Make sure you are in the mode Draw & clear the screen, then switch to and click Polyline. |
| Step 2: Draw a curve (Start drawing with dragging to right from starting point&finish drawing with right click button) | Step 2: Annotating the diagram (select an apparatus that you want from The Lab Kit template) |
Step 2:Drag vertically down from the starting point of the curve to stretch the control line.
|
| Step 3: Modify the curve (click Select/ Move&Edit Nodes) | Step 3: Adding text caption (From the Tool menu, choose "Font& Paragraph Panel", then click "Text" on the left Drawing toolbar ) |
Step 3: Place the mouse pointer over the selected curve and, while holding down CTRL+SHIFT, drag
it down.
|
| Step 4: Draw the X & Y axes. | Step 4: Inserting callouts (On the left Drawing toolbar, click the right-bottom corner of Callout & choose Square Callout) |
Step 4: Click Edit Nodes on the Editing toolbar (Click Connect Vertices &Click Flip Left to Right to flip the segment )
|
| Step 5: Right-click to finish drawing the axes. | Step 5: Reshaping Callouts (Click Edit Nodes, then add arrows to indicate the water inlets & outlets using "draw arrow" tool.) |
Step 5: Select the whole spiral by dragging the selection rectangle & make a copy of it by dragging while holding down CTRL.
|
| Step 6: Add inscription using the "Text" & "Rotate 90" tools. | Step 6: Finish (You can move or resize later the picture without the risk of losing or leaving behind any of it elements.) | Step 6: Select all the segments and group them. Then its finish. |
This software is a freeware. You can download it here
No comments:
Post a Comment